

The lino printing process can be frustrating when things don’t go according to plan - it happens to all of us. I have a few easy tips to help you get that perfect print. If you notice ink in some of your narrowly carved lines, and these details don’t print clearly, try inking with thinner layers

Are you looking to up your Cricut skills? I am going to show you 5 Hidden Cricut Settings that will make Cricut-ing faster and easier.
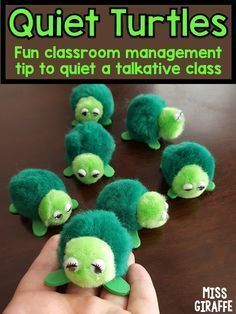
Have a chatty class? Do your talkative students get louder and louder during small groups until it feels like chaos? Do they talk when you'r...

Wondering how to create Etsy product descriptions that sell? Here are some amazing tips and an Etsy listing template you will love!

These "quiet critters" are amazingly effective!

There is no greater feeling of betrayal than being lied to. And what's worse than the feeling of being lied to by a random stranger? The feeling of being lied to by a person you love, especially when it's someone you're in a committed romantic…

A list of 14 very useful household tips. Ideas for organization, the kitchen, cleaning, children and more.

This 7 minute animal themed HIIT workout for kids improves emotional regulation and reduces meltdowns. Loved by OTs, teachers, and parents alike!

Everything you need to know about what is interfacing in sewing, types of interfacing, how to use interfacing -including interfacing tips you have to know if you sew.

These steampunk color schemes are based on pictures with brass, bronze, leather, and wood with lots of cogs and gears, as well as fantastic airships.

Tables of 6, 7, 8 and 9 in Your Hands: At the age of 8 I had to learn the multiplying tables. I've never been good at memorizing lists or tables. It was easy to learn the tables from 1 to 5 but from 6 to 9 it seemed to be way more complicated... A year later I heard this t…

Can you outline your story's theme? If you start by asking yourself these three questions, you will be able to find the heart of your story every time.

1. Research There are so many great sewing blogs out there and a lot of them share tips for specific patterns or dilemmas. Before I start any new project, I do research on what other people have to say about the pattern regarding fit and construction. It can save a lot of headaches to see

Landscape, nature and wildlife photographer Sergio Lanza gives tips on how to take beautiful landscape photos using the Canadian Rockies as an example.

9 must know Quilt piecing tips. Quilt techniques to know especially if want to learn how to quilt or want to improve your piecing accuracy.

Teach your kids how to calm down on their own with these simple tips and activities on self regulation and emotional regulation.

Want to learn how to write a thriller novel that works? Make sure you include these 6 key scenes in your story to satisfy fans of the genre! #amwriting #writingtips

These occupational therapy interventions are OT activities for kids to help with child development of functional skills.

Casting a circle is a foundational, powerful practice when it comes to ritual. It creates an energetic and psychic container - a safe, protected space - for magic and healing to take place. When you cast a circle, you are said to be in a space between worlds - void space, magic space, spiral space b

How to make a sewing pattern bigger or smaller - sewing pattern grading - make a sewing pattern a different size

One of my favorite new digital art mediums is Procreate on the iPad. It is an affordable and intuitive app to use, and you are able to create some seriously stunning artwork with it. From illustrations to animation, Procreate is a powerful tool that you can take with you on the go.

tutorial under cut!! @greyedworlds /// paper textures, brushes i use (watercolour, blending, inking)

This is the one article you need to read when you're a Procreate beginner. Learn all about layers in just a few minutes! Trust me, layers couldn't be easier. You use layers in Procreate to keep your workflow mostly non-destructive. You can have a layer for your sketch, outlines, base colors, shadows, highlights and anything

No matter how well designed a pattern may be, it cannot fit each individual perfectly. Each human body has its own quirks, and each person has different fitting needs. You may find that you need to enlarge a pattern beyond the sizes available on the sheet, or you might need to shrink it. Perhaps you

An explaination of WHAT some of these semi-automatic modes are (aperture priority, shutter priority, programmed auto) and WHEN you might want to use them.

Preparing walls for painting is the key to a good paint job! I'm sharing my best wall prep tips and tricks for patching your walls, sanding, and cleaning away drywall dust that will make your finished walls turn out beautifully!

Confused understanding aperture? Aperture, simply refers to how large or how little the opening is through the lens. Click for our simple detailed tutorial!

Hey ya'll! Today we're talking about another one of your FAQS: How to paint a room. Painting a room seems really easy to me now, but I remember how daunting it can be if you've never done it before. Let's not forget, four years ago I had never held a paintbrush, and I didn't even know where to find such a thing. What's this Depot of the Homes you speak of? And who is this 'Lowe' fellow? You mean Rob? So, needless to say, I've learned a few things through the years. And through all of my awkward trials and errors, I eventually figured out the best way to paint a room. These days, I can finish a room in about 3 hours tops, and it usually looks pretty great. It wasn't always that way. But let's not dwell. So, let's get started with the basic supplies you'll need to paint a room. There are an insane amount of paint supplies on the market. I've tried so many different products, and most of them get the job done. Listed below are my favorite items that I usually use on each job, just to make things easier on you. If you find something that works even better, let a girl know. Paint tray Tray liners (You can also use tinfoil or a plastic bag, but I honestly prefer the liners. They make cleanup so easy.) Dap White Latex Caulk, caulk gun, and caulk finishing tool (Great for filling in the gaps between the trim and walls) Spackling paste (Great for filling holes in the drywall.) Sanding sponge (Used to smooth spackle after it's dry...sandpaper also works, but I prefer using a sanding sponge.) Drop cloth Roller frame Extension pole (great for tall walls and ceilings) Roller covers(for smooth to semi-smooth surfaces) Mini foam trim roller (Great for smoothing brush marks if also painting trim.) Wooster angled paint brush (I won't paint without mine.) HANDy Paint Cup ( a paint cup with a magnetic brush holder that makes edging in along the corners SO much easier) Paint for walls (I usually use Behr, Glidden, or Valspar paint. I use flat paint for the walls and semi-gloss paint for the trim.) Paint for trim (I usually use Behr Ultra White in a semi-gloss finish.) Above links are Amazon affiliate links. Once you have your supplies, it's time to paint. I've broken the process down into 10 steps. Not all of them are necessary for every job, so if they don't apply to you, rejoice and skip to the next. 1. Cover the floor with dropcloths. Definitely don't skip this part. You will fling paint somewhere random, no matter how daintily you paint. I prefer the plastic ones because they're cheap. Plus, let's be honest, every time I buy a real one I tend to hack it up and make a headboard or something. 2. Fill any holes or imperfections in the drywall with spackling paste. Wait for the spackle to dry, and then sand it even with the wall using your sanding sponge. That way when you paint over the patch, you won't even see it and it will look good as new. Our walls were really beat up after sanding off the stain debacle, so we had to repair tons of holes and dents in the drywall before we painted. While we were at it, we removed another 1970's relic from the house, which had become extra visible since knocking down the hallway wall. Remember the doorbell? Well, Jesse turned off the electricity, did a little digging, and just decided to remove the doorbell and the broken smoke detector next to it (There's another one that actually works on the ceiling.). So, we patched it using some drywall repair patches (affiliate link), which are excellent if you have large holes in the drywall. Then, we just covered the patches with spackle, let it dry, sanded it smooth, then painted over it. Oops... lengthy hallway ramble. Moving on. 3. Remove all outlet plates. There was a time when I used to just paint around these things, but I live, I learn, I remove outlet plates. All you need is a screwdriver. 4. Make sure the walls are clean by wiping off all the dust or grime with a damp cloth. 5. Use paintable caulk to fill in any gaps between the walls and trim. Put the caulk in your caulk gun, cut off the tip of the caulk tube with scissors, then squeeze it in a straight line along the top of the trim where the gap is. Then use a rag to wipe up the excess. (You can also use a caulk finishing tool, but I usually just use a rag.) This step takes a little extra time, but I never skip it. It just makes everything look so seamless and professional. Here's a really great short video that shows how to caulk trim. It's exactly how I do it. 6. If you have areas (like trimwork or ceilings) that you don't want painted, you can use painter's tape to prevent paint from getting on those areas. Make sure to press firmly along the edge of the tape to prevent the paint from bleeding underneath. Once you're done painting, remove the tape while the paint is still wet. If the paint dries onto the tape before you're done (or if you just forget), use an exacto knife to cut the tape off. This will prevent the tape from pulling up your paint. These days, I rarely use painter's tape anymore. My little Wooster paint brush is so precise that I just don't need it. It makes edging in around corners, ceilings, and trim so easy, and I never paint without it these days. It's about $5 and worth every penny. 7. Prime if needed. I prefer to use a paint and primer in one to save time, but if you're painting over any really dark paint colors, it's usually good to apply a coat of primer separately before you paint. If I have to do this step, I usually go with Zinsser or Kilz. Just make sure you get the water based kind, as you'll most likely be using water based latex paint. 8. Start painting. When it comes to paint, most of the time I end up using Behr Premium Plus Ultra in flat for my walls. It's affordable and provides great coverage. In all honesty, Home Depot is closer to my house. So, feel free to Valspar it up if you'd like. I have many times before, and the results are just as good. :) When I start painting, I always edge in first. Edging in is when you paint around the corners of the room with a paintbrush. It gets the paint in all of the spots that the roller can't get, and it creates a nice clean line along the ceiling, etc. I use my Wooster brush to paint along the top edge of the trim (unless it's missing, like right now after the flooring was installed), ceiling, and corners. I hold the brush the narrow way, opposite of the way you would usually hold it, and this gives me a really nice straight line where I need it. Do yourself a favor and get one of these little Handy paint cups. It has a little handle on the outside, and a little magnet on the inside that you can attach your brush to. I use it every single time I paint. Another thing I can't paint without is my little stepladder. One of Jesse's coworkers gave it to him when we we got married and I assume it went something like this: 'Hey man, welcome to married life. You're a husband now. Here's a stepladder.' And I've seriously used it about 9,000 times since. He was clearly a man who knew what he was talking about. 9. After I'm done edging in, I use my roller to cover the rest of the walls. I try to cover about a 3-5 foot section at a time, moving my roller back and forth until the section is fully covered in paint. I paint in a 'M' motion to prevent roller marks. Keep a wet edge, and work from dry to wet. When the first coat has dried, repeat with a second coat if needed. 10. Once your paint is dry, you're done. You can clean up and get back to living a normal life. Or you can be like me and still have 800 things to do. Also, ignore my back deck. It knows not what it do. A note about trim: If you also need to paint your trim, you have two options: #1: remove and paint, or #2: Leave it on and paint it while it's attached. You may remember that the first time I painted the house several years ago, I left the majority of the trim on the walls, and just painted it while it was attached. If you're doing it that way, you'll most likely want to paint your trim before you paint your walls, and then edge in with your wall paint. It's just easier that way. You can find that tutorial here. In my current situation, we had to remove all of the trim to install the floors, and so we decided to replace all of the 1970's trim with more substantial trim. So, we are currently in the process of installing and painting the trim, after we painted. Expect me to blog about that in 2017...or at least a few weeks. And that, friends, is how you paint a room. I hope this helps answer some of the questions that you may have. There's still nothing in any of our rooms right now (although we did move the couches upstairs this week. Miracle.), so most of the rooms are just big empty boxes. But, if you're curious...I did include a few pics of the kitchen and living room in the post earlier this week in case you missed it. I'll be back soon to share more! In the meantime, I'll leave you with some Cheese. She seems to really appreciate my new floor registers/air vent things. Just look at her little foot caressing it. Girl knows an upgrade when she see it. That's all, ya'll! 'Til next time! Follow my blog with Follow my blog on or or Subscribe to LiveLoveDIY with email! Enter your email address: -->

In this tutorial, I share exactly what you need to know to avoid blurry edges in Procreate, why they happen and how to avoid them from ever happening

The best 28 Cricut and Design Space Hacks that every beginner should know. These Cricut hacks will keep you organized and help you in Design Space!

The ultimate curriculum platform for K-12 art teachers. FLEX gives art teachers access to a rich library of standards-aligned curriculum materials so they can save time and focus on teaching and student learning.

Here are 12 top tips & tricks on how to use micron pens to help get your creative juices flowing!

Have you ever wondered how to undo serger stitches without ripping them out one by one? This tutorial will show you how.

Have you ever wondered what the Bible says about fasting? Or even the types of fasting in the Bible? Perhaps you’ve considered fasting and were curious what the rewards and benefits of a biblical fast

Colors, we've seen before , quickly convey emotions and affect people's moods. Whether you're choosing paint for a room or are designing a presentati

Got a talkative class? Check out these 5 ways to quiet the chatter!

Getting ready for your next home renovation project, and planning on taking the DIY approach? Whether you’re trying to figure out the best configuration for your doorway, the perfect type of hardwood for your kitchen

When my oldest was 4, I decided I would teach him preschool at home. As scary as it may seem to you now, you can learn how to homeschool preschool! You have what it takes to get your kids ready for kindergarten. Although my kids were learning through play, they weren't learning some things yet
